Using Forms9Patch.Image
Forms9Patch.Image extends Xamarin.Forms.Image to provide Xamarin.Forms with a patch scalable image element, the ability to tile an image within its alloted bounds, and the rendering of SVG images. The ImageSource for the Forms9Patch.Image element can be specified either as a Forms9Patch.ImageSource or a Xamarin.Forms.ImageSource. Supported file formats are NinePatch (.9.png), .png, .jpg, .jpeg, .gif, .bmp, .bmpf, and .svg.
Background
iOS's UIKit provides resizableImageWithCapInsets: to make an UIImage a patch scalable image. The capInset argument is used to specify the regions (distance inset from the edges) which will not scale (or scale in only one direction) when the image is stretched to fill it's parent view. Similarly, Android provides NinePatchDrawable to allow apps to display Nine-patch images as scalable drawing elements. The Nine-patch image format is used to specify the regions that are allowed to scale when the image is stretched to fill it's parent view.
Both approaches have their advantages. Unlike iOS's resizableImageWithCapInsets:, Android's and Forms9Patch's use of the Nine-patch image format allows for unscalable regions to be anywhere in the image (not just at the edges). And, because the scaled regions are marked within the image file, scaling can be customized to each file. On the other hand, resizableImageWithCapInsets: provides the ability to define the scaling regions at runtime - which provides additional flexibility and convenience.
Seeing advantages to each approach, Forms9Patch.Image allows for both. If a NinePatch image is provided, Forms9Patch.Image uses it's scalable region marking. If the CapsInset property is set, Forms9Patch.Image will use it to set the unscalable edges - which means CapsInset will always override NinePatch regions.
`## Xamarin.Forms.Image.Aspect vs. Forms9Patch.Image.Fill
Xamarin.Forms.Image provides the Aspect property to indicate how an image will fill its bounds. Forms9Patch.Image does not support the Aspect property. Rather, it has the Fill property. The Fill property supports the Aspect property's AspectFill, AspectFit, and Fill values and adds the Tile value for easy management of textures. See the Forms9PatchDemo app for examples of it in action.
NinePatch image example
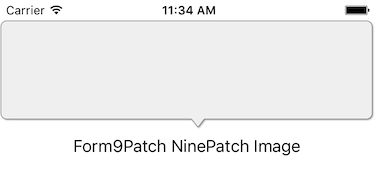
Let's describe the use of Forms9Patch.Image for NinePatch images through an example. Say you want to display a pop-up message bubble where the tip is centered. Because they can have multiple scalable regions, the Nine-patch format works great for this. Starting with a .png of the bubble, use a NinePatch editor, like Android's Draw 9-patch to mark the horizontal and vertical stretchable regions.
| Before marking | After marking |
|---|---|
 |
 |
bubble.png |
bubble.9.png |
| 200x122 | 202x124 |
After adding bubble.9.png to your cross-platform project as an EmbeddedResource, you can display it using something like the following:
var bubbleImage = new Forms9Patch.Image ()
{
    Source = ImageSource.FromResource("MyDemoApp.Resources.bubble.9.png"),
    HeightRequest = 110,
}
var label = new label ()
{
    Text = "Forms9Path NinePatch Image",
    HorizontalOptions = LayoutOptions.Center,
}
Resulting in:
CapsInset Property
Coding the CapsInset Property
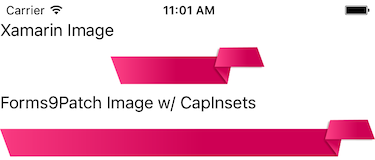
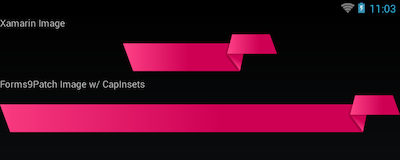
The CapInset property is used to specify the regions (distance inset from the edges) which will not scale when the image is stretched to fill it's parent view. For example, let's make the following image a banner by scaling it horizontally.
 |
|---|
| ResourceID: MyDemoApp.Resources.Images.redribbon.png |
| Image Size: 308x80 |
Load it using Xamarin.Forms.ImageSource as the source to Forms9Patch.Image and then, set the CapInsets property:
var label1 = new Label ()
{
    Text = "Xamarin Image",
}
var image1 = new Xamarin.Forms.Image ()
{
    Source = ImageSource.FromResource("MyDemoApp.Resources.Images.redribbon.png"),
}
var label1 = new Label ()
{
    Text = "Forms9Patch Image w/ CapInsets",
}
var image2 = new Forms9Patch.Image ()
{
    Source = ImageSource.FromResource("MyDemoApp.Resources.Images.redribbon.png"),
    CapInsets = new Thickness(23, 0, 110, 0),
}
| iPhone | Android |
|---|---|
 |
 |
XAML Example
To use Forms9Patch.Image in your XAML, you will have to add the Forms9Patch namespace (from the Forms9Patch assembly) and then use Forms9Patch.Image where desired. Also note that, if you want to use Embedded Resource images, you will need to add an XAML markup extension to the assembly that contains those images (see Using Forms9Patch.ImageSource). For example:
<?xml version="1.0" encoding="UTF-8"?>
<ContentPage
    xmlns="http://xamarin.com/schemas/2014/forms"
    xmlns:x="http://schemas.microsoft.com/winfx/2009/xaml"
    xmlns:local="clr-namespace:MyXamlDemo;assembly=MyXamlDemo"
    xmlns:Forms9Patch="clr-namespace:Forms9Patch;assembly=Forms9Patch"
    x:Class="MyXamlDemo.MyPage"
    Padding="5, 20, 5, 5">
    <ScrollView>
        <ScrollView.Content>
            <StackLayout>
                <Label Text="Xamarin.Forms.Image"/>
                <Image Source="{local:ImageMultiResource Forms9PatchDemo.Resources.Images.redribbon}"/>
                <Label Text="Forms9Patch.Image w/ CapInsets"/>
                <Forms9Patch:Image
                    Source="{local:ImageMultiResource Forms9PatchDemo.Resources.Images.redribbon}"
                    CapInsets="23,-1,111,-1"/>
            </StackLayout>
        </ScrollView.Content>
    </ScrollView>
</ContentPage>
Embedded Resource Convenience Constructor
If you do most of your layouts in code (rather than XAML), there are tasks you repeat very often. And because they are repeated so often, a shorter version
of that task would be convenient. If you often use Forms9Patch.ImageSource.FromMultiResource, Forms9Patch.ImageSource.FromResource, or Xamarin.Forms.ImageSource.FromResource as the source for your Forms9Patch.Image or Xamarin.Forms.Image, you will be happy to know that you can instead pass the EmbeddedResourceId as an parameter to the Forms9Patch.Image constructor.
var image = new Forms9Patch.Image("Forms9PatchDemo.Resources.Images.redribbon");
Fill Property
Forms9Patch.Image.Fill property is almost identical to Xamarin.Forms.Image.Aspect property. It is only different in that it uses Forms9Patch.Fill instead of Xamarin.Forms.Aspect - which means it also supports Forms9Patch.Fill.Tile to direct Forms9Patch.Image to tile a source image in the image layout.
TintColor Property
There are times where it is desireable to theme an app at runtime. One way of doing this is by changing the color of monochrome images (often used as icons). Forms9Patch makes this easy by giving Forms9Patch.Image the TintColor property.
var image = new Forms9Patch.Image("MyApp.Resource.Printer.png")
{
    TintColor = Color.Blue
};
| Source Image | w/ TintColor=Color.Blue |
|---|---|
 |
 |
Note: The TintColor property is intented for use with raster images that have and makes use of the transparent color plane. Results will likely be undesirable for other types of raster images. This property is ignored for vector (.svg) images.
SourceImageSize Property
Want to be sure you got the image you intended to ask for? This question can come up when you're doing cross platform development. The SourceImageSize property can help with this by giving you the size of the ImageSource being used for the image.
NOTE: For NinePatch images (.9.png), the value returned does not include the two extra pixels in width and height for the NinePatch markup.
AntiAlias Property
Xamarin.Forms relies on the platform image elements to render images. A small performance improvement can be had by not applying an anti-alias algorithm to the image during rendering. Just as Xamarin.Forms, Forms9Patch.Image preforms this anti-alias step by default. However, if you're upscaling an image a bit much and you don't care about some pixalization, then you want a little more performance by setting this property to true.
BackgroundColor Property
What? Why would an image need a background color? Well, usually it wouldn't but images with transparent regions (.png and .svg) create an opportunity. Just as you can use the TintColor to theme a monocrome raster image, you can use BackgroundColor to them the transparent regions of such an image. Cool, huh?
| Source image | BackgroundColor=Color.Orange |
|---|---|
|
 |
Note the corners are rounded on this image!
Outline and Shape Properties
Taking things a step further than we did with the BackgroundColor property, why not be able to continue to dress up the image? Clipping an image to a shape and/or adding a border are two common operations applied to images when they are used as app assets. Since this is so common, Forms9Patch has them built-in. To set the shape, use the ElementShape property (which takes a Forms9Patch.ElementShape value). Available values are:
| ElementShape | Description | Full Bleed Image Example |
|---|---|---|
| Rectangle | pretty much the same as "don't clip" |  |
| Square | clip the longest side to be the same length as the shortest side |  |
| Circle | because, circle clipped head shots are so 2015 |  |
| Ellipse | still waiting for this one to be cool |  |
| Obround | it's embarrassing how long it took me to find out there was a name for this shape |  |
And, if you used Xamarin.Forms.Frame before, Forms9Patch's Outline properties will seem familiar:
| Property | Description | Transparent PNG Example |
|---|---|---|
| OutlineColor | Color of Forms9Patch ElementShape's outline |  |
| OutlineWidth | Width of Forms9Patch ElementShape's outline |  |
| OutlineRadius | Forms9Patch Element's corner radius. Only applies to Rectangle and Square shapes |
 |
HasShadow and ShadowInverted Properties
Let's go out on limb and keep adding embelishments to the image. Once you have the ability to impose a shape to your image, it is common to want a shadow to match the imposed shape. HasShadow makes that happen. And, going even further, ShadowInverted reverses the shadow to give a recessed effect to the shadow.
Now, here is where Forms9Patch can do something a bit clever. If the ImageSource is a *.png image with transparency in the image, the HasShadow property of Forms9Patch will impose the shadow on the overlap of the ElementShape and the non-transparent parts of the image! NOTE: Setting ShadowInverted to true breaks this functionality.